Thursday, December 21, 2017

Saturday, April 2, 2016
Paper Pumpkin March 2016
Howdy Peeps! It's a windy, spring day here in the country so it's a good day to post my latest card from Stampin Up's March 2016 monthly card kit.

For info on the Stampin Up! monthly card kits click here.
For a video on the Ruffle fold see Patsy Waggoners blog Stamps to Die For click here.

The card base [comes in the kit] is white with pretty blue splatters. I tried the new Ruffle fold with the patterned paper [also in the kit]. It looks complicated... but it's super easy. I embossed a piece of blue paper for the background behind the patterned paper, and the flowers were cut with Stampin Up!
Botanical Builders Framelits.
Well Peeps, that's it for me today. Thanks for stopping by, hope you enjoyed your visit!
For a video on the Ruffle fold see Patsy Waggoners blog Stamps to Die For click here.
Friday, March 18, 2016
The Sky is the Limit
Good afternoon Peeps! Hope everyone out there in Blog Land is happy and healthy... it's beautiful today here in the country.
I have a fun card to share with you today... a slider card.

The turquoise card stock was stamped with the clouds and greeting first. Then I used the Dotted Swiss embossing folder, by Darice, to add the polka dots. The vintage airplane was stamped on a scrap of white card stock and then cut out by hand. All stamps are from the "Sky is the Limit" stamp set from Stampin Up.When you tilt the card from side to side the plane spins. A slider card is always fun to make and give, and my son enjoyed this one immensely.
Thanks so much for stopping by... hope you enjoyed your visit!
I have a fun card to share with you today... a slider card.

Thanks so much for stopping by... hope you enjoyed your visit!
Saturday, March 12, 2016
With Sympathy
I don't like making Sympathy cards, but it unfortunately has to be done. The part that I really don't like, more like hate, is that I've recently depleted my cards on hand. When I make them I tend to go simple and usually white on white. I used an embossing folder to get the raised center design, and added my stamping to the center. A simple silver bow was added and I called it done. My hope is that I won't have to start sending these out any time soon.

Thanks so much for stopping by... hope you enjoyed your visit! I always welcome comments.

Thanks so much for stopping by... hope you enjoyed your visit! I always welcome comments.
Friday, February 26, 2016
Paper Pumpkin February 2016
February's Paper Pumpkin kit from Stampin Up! included all the materials needed to make 9 greeting cards. I also got step by step instructions with pictures. The first picture shows the supplies in the kit. The first, second, and third cards follow the directions pretty closely. For the second and third I sponged around the edges of the cards with Marina Mist ink.
I like to see what I can create with the kit other than what the directions give. For the fourth and fifth cards I jazzed things up a bit.


For this card I created a water color background using Blackberry Bliss [ink that's in the kit], and some Marina Mist ink. I matted the background on Blackberry Bliss and Tangelo Twist card stock. The floral center piece is one of the card fronts that I cut up and matted on the same card stock as the background. I added some ink splatters and water splatters just for visual interest.

For the last card I used one of the card fronts that came with the kit and another piece of the floral card front for the banner. I used the same colors of card stock as the last card for the matting.

Thank you for stopping by... hope you enjoyed your visit!
Thursday, February 25, 2016
It's Been A Long Time
Hi Peeps!
I know, it's been over a year since I posted anything. No, I didn't get abducted by aliens, or lost in Neverland... just busy putting my house up for sale, packing, putting belongings in storage, and moving out of state. So busy in fact... that something had to be put on hold, and unfortunately that was my crafting.
Now that I'm somewhat settled, and some boxes are unpacked [especially crafts] I can get back in the swing of things.
I know, it's been over a year since I posted anything. No, I didn't get abducted by aliens, or lost in Neverland... just busy putting my house up for sale, packing, putting belongings in storage, and moving out of state. So busy in fact... that something had to be put on hold, and unfortunately that was my crafting.
Now that I'm somewhat settled, and some boxes are unpacked [especially crafts] I can get back in the swing of things.
Tuesday, August 19, 2014
Man Stripes
Good Morning Peeps!
As you may have noticed, moustaches are the rage right now. I've had this moustache dies/stamp set by HeroArts for a while and just got around to using it. [It's not as easy using a 'stache as you might think.] I seem to neglect masculine cards and decided it was time to solve that problem.

The DUDE and sentiment stamps are from Simon Says Stamp card kits. I fussy cut around the DUDE stamp to leave a small white edge to mimic the 'stache. I turned the sentiment into a banner, added 3 black liquid pearl dots for buttons, and called it done.
Not only did I get 4 cards from a leftover pieces of striped paper, but I finally found a way to use my moustache die/stamp set, and have masculine cards to send in to Operation Write Home! Now I call that a successful craft session.
My back porch swing is calling me so I'll say bye for now. Thank you for stopping by... hope you enjoyed your visit!
Sunday, August 17, 2014
Monkey Time
Howdy Peeps! I tell you, sometimes my craft space becomes a bottomless pit... or land of the lost. Yup, that's what it is.
I had made a card similar to this a while back for a fun fold challenge. The fun fold wasn't anything to write home about [my humble opinion] because it used more card stock for the fold, and you could get the same effect without the extra step. I couldn't find the video for the fun fold, but no biggie as I wasn't going to use it anyway. But... I had extra paper because I liked it so much... but then lost it. [mumble, mumble] Fast forward to now, two months later... I found the paper and made more of these cards before I lost the paper again.

The monkey/blue & white dotted paper is a double sided piece. The front paper is cut 1" narrower [that would be 3 1/4"]. The left side of the front is a 1 1/4" strip of solid blue hand cut into fringe. I used a 3" scallop circle punch for the half circle on the right so part of the monkey would be showing. I also sponged brown along the edges.

The monkey on the inside is a builder punch by McGill, and the balloons are made with a Marvy paper punch. A couple of pieces of baker's twine, and a stamped sentiment later, I have a CASE card like the original - minus the fun fold. [The builder punch for the monkey has several small pieces/parts to make the monkey, and takes a little time... but the end result was worth it. Plus... I got the punch at 75% off so it's all good!]
Well, I going to get going. Maybe I'll find some more lost treasures in my craft space. Thank you for stopping by... hope you enjoyed your visit!
Sunday, June 29, 2014
Flowers in Silhouette
GoodW Morning Peeps!
It looks like another rainy day here as storm clouds are moving in. We've had a lot of rain, but nothing compared to the flooding the folks in the Plains have had. It's been a good day to work on this week's OWH Sketch Challenge #231. The link is Here.

I really couldn't decide what to put in the one panel until I looked at my stamps. This flower silhouette stamp just said "pick me!", so I did. I used a glitter pen on the flower, BUT, this is not acceptable for the troops. This one I made for a friend, but I'll make others without the glitter for the troops.

Well, the storm clouds are really meaning business so I'll get off here. Thanks for stopping by... Hope you enjoyed your visit!
It looks like another rainy day here as storm clouds are moving in. We've had a lot of rain, but nothing compared to the flooding the folks in the Plains have had. It's been a good day to work on this week's OWH Sketch Challenge #231. The link is Here.
I really couldn't decide what to put in the one panel until I looked at my stamps. This flower silhouette stamp just said "pick me!", so I did. I used a glitter pen on the flower, BUT, this is not acceptable for the troops. This one I made for a friend, but I'll make others without the glitter for the troops.
Paper: Authentique 6x6 pad
Flower stamp: Hero Arts
Sentiment: Simon Says Stamps
Well, the storm clouds are really meaning business so I'll get off here. Thanks for stopping by... Hope you enjoyed your visit!
Saturday, June 28, 2014
Card in a Box
Good Morning Peeps! I have a fun project to show you, and in spite of how hard it looks, it's really very easy and goes together quickly. The "box that is"... but you can spend a good bit of time picking all the cute goodies to put in your box. [giggle] It's called a card in a box, and actually folds flat to fit inside a standard A2 envelope.
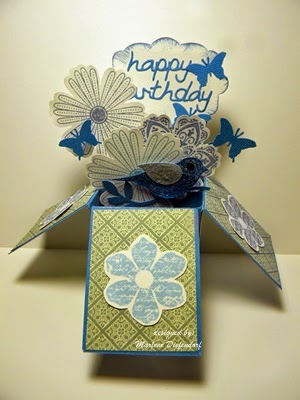

I found a great You Tube tutorial from the blog Mommy-Stamper by Brianna Thompson. The link to her post and tutorial is Here. Take a few minutes while you're there to check out the rest of Brianna's blog... such a talented and creative lady.
Well Peeps, that's it for me today. Time to take some hard earned money and go grocery shopping. Hmmm... did you ever think about that one? Take food off shelf and put in basket, take food out of basket and put on checkout counter, put bags of food in car, take bags out of car into house, take food out of bags and put on shelves. One gigantic multi-step circle from shelf to shelf. [giggle]
Friday, June 27, 2014
OWH Sketch Challenge #230.
Hello Peeps!
Did you ever have a day when things didn’t
go as planned or as expected? Of course you have, we all have. Today is another
one of those days for me. It’s actually been more than just today… try
all week! [Momma said there would be days like this. But so many in a row??]
I have literally been working on Sunday’s OWH sketch all
week. Crooked paper, crooked or half inked stamping, along with other mishaps
has turned a simple task like making a two cards seem endless. Yes, I was about
to pitch it all until my daddy’s stubborn streak kicked in and I was determined
to finish, as the old saying goes, come
hell or high water!
This photo looks yellow, but the cardstock and DSP are really a pretty shade of peach. The sentiment is stamped.


Thanks so much for stopping by, hope you enjoyed your visit. As always, your comments are greatly appreciated. I always read them and I thank you.
Friday, June 20, 2014
Playing Catch Up.... Again!
Good Morning Peeps! How is everyone out there in blog
land? Two weeks ago my garage was hit by lightning, so it’s been crazy around
here. I’m just thankful it wasn’t my house! Things are slowing down a bit, but
now I find I’m getting a little nervous when I hear thunder. I have never been
afraid of thunderstorms, and I’m still not, just find myself a tad nervous. I
know lightning can hit twice… I just hope it does not happen here!
Today I’m catching up on Operation Write Home Sketch
Challenges. This is Sketch 229 from this past Sunday. Be sure to check out the links for the sketches... they have measurements! The link is Here.
I used a 'manuscript' embossing folder for the background of the first card. My white inner circles on both cards called for 1 1/4" circles, so I had to adapt it because I don't have that size. I've used 1 1/8" circles.

Can you believe the monkeys are stickers? They're so stinkin cute, but in hindsight I think the stickers and background paper are too busy together.

This one is Sketch 228 from a week ago Sunday. The link is Here. I got the papers on both of these cards from paper pads that I found at a clearance sale.
Well, that's it for me today peeps!


Well, that's it for me today peeps! I'm planning on a nice, relaxing drive in the country today. I hope you have something nice and relaxing planned as well.
Thanks for stopping by... hope you enjoyed your visit!
Friday, May 16, 2014
Watercolor Cards
Good Morning Peeps!
I have some fun watercolor cards that were made without water. What??? Yep, you heard me, without water. It's a fun stamp set from Stampin Up called Happy Watercolor. Each month my SU demonstrator, Ashley McAllise has a class and these were made during class. What I love about this set is the "splotch" stamp that's in the first card looks so much like a splotch of watercolor.
Playful splashes of color from stamp and ink.

Sponge on a couple colors of ink and stamp the flowers.

Watercolor splotches again.

I love how the flower peeks out from the negative space left by using a circle punch.

This one is just so whimsical. It's rather narrow so we made our own envelopes with the Envelope Punch Board.

Well, that's about it for me today. Thank You for stopping by, hope you enjoyed your visit!
I have some fun watercolor cards that were made without water. What??? Yep, you heard me, without water. It's a fun stamp set from Stampin Up called Happy Watercolor. Each month my SU demonstrator, Ashley McAllise has a class and these were made during class. What I love about this set is the "splotch" stamp that's in the first card looks so much like a splotch of watercolor.
Playful splashes of color from stamp and ink.
Sponge on a couple colors of ink and stamp the flowers.
Watercolor splotches again.
I love how the flower peeks out from the negative space left by using a circle punch.
This one is just so whimsical. It's rather narrow so we made our own envelopes with the Envelope Punch Board.
Well, that's about it for me today. Thank You for stopping by, hope you enjoyed your visit!
Thursday, May 15, 2014
Spring Has Sprung With Tulips!
Good Morning Peeps!
There was a challenge on ScrpaZee to make a tag. I've made tulips before with the SU bird punch. On Pinterest I saw some punch art where the SU owl punch was for a vase. So I decided to combine both ideas for my tag.

The tulip uses 3 wings from the bird punch. I daubed some ink on the edges before I glued the tulips together. I had a lot of fun making this and it lifted my spirits too. It was raining and gloomy that day so it was fun making something happy and cheerful.
Thanks for stopping by, hope you enjoyed your visit!
There was a challenge on ScrpaZee to make a tag. I've made tulips before with the SU bird punch. On Pinterest I saw some punch art where the SU owl punch was for a vase. So I decided to combine both ideas for my tag.
The tulip uses 3 wings from the bird punch. I daubed some ink on the edges before I glued the tulips together. I had a lot of fun making this and it lifted my spirits too. It was raining and gloomy that day so it was fun making something happy and cheerful.
Thanks for stopping by, hope you enjoyed your visit!
Wednesday, May 14, 2014
Wild Wacky Weekend Cards 2014
Good Morning Peeps! Today I’m showing you some of the
cards I made at the Wild Wacky Weekend. As most of you know I make cards for
Operation Write Home, so these cards
will be added to my box. Cards are blank on the inside so the troops can write
their own messages inside.
This design is made using Authentique double sided paper.
The button design is on one side and the Country Kids are on the other side. I
thought it went well with my button embossing folder. Very little designer
paper is used so it’s perfect for scraps.

I really had fun with these cards. The card stock,
designer paper, and stamps are all from a Monthly Card Kit by Simon Says
Stamps. I fussy cut the sun, mounted it on black, and fussy cut again. I love
the irregular sun rays.

I love the look of sunburst cards so I had to make some.
I used odds and ends papers from various 6x6 paper pads, and inked the edges
for some interest. These cards will be Any Hero cards, and since they are for
the troops themselves I don’t have to worry about embellishments that are too
thick.


Thank You for stopping by, hope you enjoyed your visit!
Tuesday, May 13, 2014
Wild Wacky Weekend 2014
Oh my goodness! Wild Wacky Weekend 2014, sponsored by
Winnie Thacker, owner of The Scrapbook General Store was held this year it was held February
27th & 28th and March 1st & 2nd as usual, at
Carter Caves State Park in Olive Hill, Kentucky.
The first photo is of the Easter Bunnies Wanda and Jean.
I’m dedicating this post to the memory of Jean who passed away 2 weeks after
this weekend.

The second photo is the crazy talented, and fun, Winnie Thacker. I’m sad to say, as of this post, Winnie is closing her shop after 16 ½ yrs of being in business. I am so going to miss Winnie and all the gals I’ve made friends with for the last 5 years.

The next 2 photos are just general photos of gals working.
The second photo is the crazy talented, and fun, Winnie Thacker. I’m sad to say, as of this post, Winnie is closing her shop after 16 ½ yrs of being in business. I am so going to miss Winnie and all the gals I’ve made friends with for the last 5 years.
The next 2 photos are just general photos of gals working.


Monday, May 12, 2014
Mini Spool Card w/Envelope Punch Board
Hello again. I know... I've been missing in action again since the beginning of March. That darned Vertigo struck again which is so annoying. During that time my computer work takes a back seat. I have been making cards and other projects, so now I can post them.


This is one of the cards I found on Pinterest. The 3"x3" spool shape comes from using the Envelope Punch Board. These go together lickety split and use scraps. How cool is that? I made a set of 6 in about a half an hour, except for the needle. lol! I decided the spool needed a "a little something" and commenced drawing a needle shape. Now, I don't have any art experience but the needle shape wasn't that hard. The hard part was making it a size big enough to look right. The next set I will leave a tail of twine loose to thread through the needle.
The pin on Pinterest was to papercrafter45. The pin credited Karen Titus for the idea and video. Karen's blog is Stampin on the Back Porch and the link to her card and video is Here.
Thank You so much for stopping by, hope you enjoyed your visit!
This is one of the cards I found on Pinterest. The 3"x3" spool shape comes from using the Envelope Punch Board. These go together lickety split and use scraps. How cool is that? I made a set of 6 in about a half an hour, except for the needle. lol! I decided the spool needed a "a little something" and commenced drawing a needle shape. Now, I don't have any art experience but the needle shape wasn't that hard. The hard part was making it a size big enough to look right. The next set I will leave a tail of twine loose to thread through the needle.
The pin on Pinterest was to papercrafter45. The pin credited Karen Titus for the idea and video. Karen's blog is Stampin on the Back Porch and the link to her card and video is Here.
Thank You so much for stopping by, hope you enjoyed your visit!
Friday, March 7, 2014
Die-Version Sunshine

Good Morning Peeps! Welcome to my stop on the
Die-Version Blog Hop at Operation Write Home, and sponsored by Die-Version. You
can visit their shop HERE.
If you came here from Lisa’s blog you’re in the right place. If not, you’ll
want to start back at the beginning by going to Operation Write Home’s blog, “Stars and Stamps”, which is HERE..

I absolutely love this die and I knew I wanted to do
something a little different. I kept it rather plain, only adding an orange
ribbon. No bow, knot, or anything else. I backed the die with orange card stock
and cut the rays out of yellow and orange. The background paper has bits of
yellow and orange that coordinate with the sun. I hope you like it.
You’re next stop is the ever talented, and creative,
Mary. Here blog, Come Craft w/Me” can
be found at the link HERE..
Enjoy you Hop, there are lots of terrific cards and
inspiration. Thanks for stopping by, hope you enjoyed your visit!
Friday, January 31, 2014
A Background and a Sketch
Oh my goodness peeps, I've been busy, busy, busy. Part of my busy has been spent thinking of what I want to make at my 4 Day crop the end of February. I've narrowed down the kinds of cards I want to make. Now I'll be busy making kits. Before I've always planned on the spot and I don't get very much accomplished. This time I'm going to measure, cut, and punch my pieces parts ahead of time. I'll let you know how it goes.
This week Operation Write Home has Sketch Challenge 209, and ScrapZee has a background challenge going on.
The ScrapZee challenge is to use a corner of a 12x12 design paper as the background of your card. I normally buy design paper with an overall design so I don't have to worry about the pretty corners. So I went with 6x6 paper pads where there are corner designs.


Here's my card.

I love the colors and designs of the paper pad! The long strip on the left side, and the two banners are from the pad. I used a button die from Sizzix and some twine. For the rectangle I used design paper and matted it on card stock. The only thing I didn't do is the three dots and the bottom. I got so wrapped up in this card I didn't even give that element a thought. The center of the rectangle is a very soft gray and white. I left it blank so I could add a sentiment as needed.
I'll leave you with a parting thought: I'll be looking at Designer Series Paper [DSP] with brand new eyes!
This week Operation Write Home has Sketch Challenge 209, and ScrapZee has a background challenge going on.
The ScrapZee challenge is to use a corner of a 12x12 design paper as the background of your card. I normally buy design paper with an overall design so I don't have to worry about the pretty corners. So I went with 6x6 paper pads where there are corner designs.
I've had this paper pad a long time so I don't remember who made it. All I did to the paper was add some Glossy Accents by Ranger on the word Love. Since there were already hearts along the bottom edge I punched out some hearts with the Heart punch by Martha Stewart. It also punches hole to thread ribbon, so that's exactly what I did to make the banner. A couple of silver Pearl Pen dots to anchor the ends, and I called it done. Clean, simple, and easy. Using a corner design suddenly became a lot easier.
The Operation Write Home weekly sketch goes together very quickly. I also used a 6x6 paper pad by Teresa Collins, and used a corner for the background. Here's the sketch:
Here's my card.
I love the colors and designs of the paper pad! The long strip on the left side, and the two banners are from the pad. I used a button die from Sizzix and some twine. For the rectangle I used design paper and matted it on card stock. The only thing I didn't do is the three dots and the bottom. I got so wrapped up in this card I didn't even give that element a thought. The center of the rectangle is a very soft gray and white. I left it blank so I could add a sentiment as needed.
I'll leave you with a parting thought: I'll be looking at Designer Series Paper [DSP] with brand new eyes!
Thanks for stopping by, hope you enjoyed your visit!
I read and appreciate your comments.
Wednesday, January 22, 2014
Monster Love
How are you doin peeps? I’m still a semi shut-in because
of this crazy dizziness. On the bright side, it’s too cold out for me so I
don’t mind being inside. On the down side, I have to have someone drive me
wherever I go. Back on the bright side, I have lots of time to make cards. So…
it all works out!
The card I’m showing you today is for the Monday
challenge over at ScrapZee. We’re to make a Valentine’s card using red, white,
and one other color. Soooo… here’s what I came up with.
Outside:

Inside:

I just love this monster and these sentiments that’s in
the January 2014 Monthly Card Kit from “Simon
Says Stamps!”. This one is for my GD, age 12, who loves lime green. I’ve
also got the pieces/parts made up for another GD, age 9, and two GS’s, age 4
and 2.
Time for me to go and work on my 2014 Calendar. Yeah, you
might say I’m a tad late… but I just have to finish the last half of the year.
Thanks
for stopping by, hope you enjoyed your visit!
I
appreciate and real all comments.
Subscribe to:
Posts (Atom)